
Today I am going to do a review of Stessa, an online rental property accounting platform.
But first, a disclaimer:
***This review may contain affiliate links that compensate me for user registrations of this product.***

As I have detailed in a previous article, I started using Stessa last year to track accounting for our rental portfolio. Previously, we used Google Sheets, tracking rental income and expenses for each property on different tabs. This would involve me going in to the first property’s income tab, entering the collected rent, then checking all of my receipts and accounts to verify I hadn’t missed any expenses and adding them to the expense tab for that property. I set up expense categories and put in a section to summarize the expenses by category and by month. While not ideal, it insured that someone at my CPA’s office was not classifying an expense in the wrong category or for the wrong property. It was not hard to do, just more a matter of remembering to do it.
Around the middle of 2018, I started seeing advertisements for a product called Stessa on Facebook. As per my SOP, I ignored them, other than taking note of the name. A few weeks after first seeing the ads, I heard an advertisement for it on The Bigger Pockets Podcast. This was more effective, as they pointed out how it was free for rental property owners and individual investors and involved some automation to keep track of your accounting. They also pointed out how the product was developed by real estate investors for real estate investors and the name was “assets” spelled backwards.
I went to the web site and registered for it. I was able to set up our properties and import bank & credit card histories to the transactions section, allowing me to categorize each expenditure. It took maybe 10 minutes to set up two properties. And, once numbers had been entered, the dashboard populated with portfolio metrics. Way nicer than my spreadsheets!
Features
Individual tracking for each property:
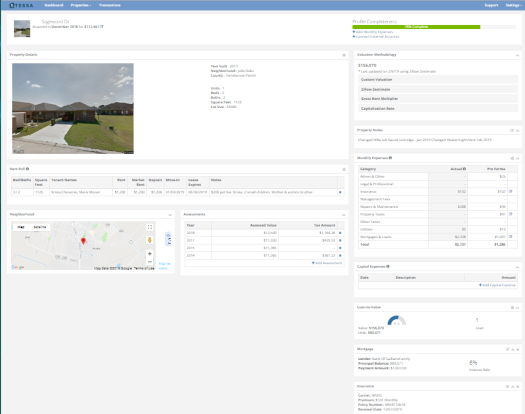
Property Profile Header – Address, Acquisition Date, and Cost.
Property Details – (Year built, neighborhood, parish [county, for those of you outside Louisiana], number of units, bedrooms, bathrooms, square footage, and lot size, all pulled from Zillow, based on the address.)
Valuation – Provides for multiple options: Custom Valuation, Zillow Zestimate (automatically polled, user choice to update property valuation), Gross Rent Multiplier, or Capitalization Rate.
Rent Roll – Allows entry of Bed/Baths, Square Feet, Tenant names, Rent, Market Rent, Deposit, Move-in Date, Lease Expiration Date, and notes.
Property Notes section – Freeform note space for property.
Monthly Expenses – Allows for Pro-Forma expense entry and pulls in categorized expenses from the Transactions section to show actuals compared to Pro-Forma.
Neighborhood – Shows location on a Google map, with a Walk Score and a Bike Score for the property.
Assessments – Pulls in assessed value and property tax amount (I’m assuming from Zillow), and allows you to add missing assessment/tax details.
Capital Expenses – Allows for entry of Date, Description, & Amount of Capital Expenditure.
Loan-to-Value – Shows a chart with LTV percent, Property Value, Debt (principal balance), and number of loans.
Mortgage – Details the Lender, Principal Balance, Payment Amount, and Interest Rate.
Insurance – Displays the Carrier, Premium, Policy Number, and Renewal Date.
Transactions:
As I mentioned above, Stessa allows you to link bank accounts and credit cards to the Transactions ledger. It lets you initially import all transactions and gives you the option to review them to either categorize each one correctly or, in my case, the credit card I use also has personal charges, so it it allows me to delete those transactions.
Stessa does not store your credentials on their servers and use bank-level encryption to secure the transfer of information. It also does not allow changes to your bank or credit card accounts. It only pulls a copy of your transaction information.
The Transaction Ledger Menu allows you to review new transactions, view ALL PROPERTIES transactions, view individual property transactions, or add a new property.
The main Transaction Ledger display shows all transactions, filtered, based on the menu selection. It additionally allows you to search by keyword and/or filter by Date, Category, Amount, or Account.
There is also an export function, allowing you to export filtered transactions to a *.csv file.
You can manually import *csv and *.qif files from accounting software, in addition to adding individual transactions by hand, such as mileage.
Reporting – Reporting is one of the reasons I was interested in trying out Stessa in the first place. It provides you with standard reports such as Income Statements, Cash Flow, and Capital Expenditures, with options to select a date range, property/portfolio, monthly breakout, and whether or not to show Category Details. The report is downloaded as an Excel file, allowing you to customize the report title and report formatting, if needed.
The other reporting option I have mentioned before is the Tax Package. This contains everything needed to hand off to your CPA at tax time. And it sure makes it easier on me!
Click on this link to get your own free copy of the Rental Property Tax Guide by Stessa.
Dashboard
The dashboard is the main page you see when logging in on a computer. It allows you to show the total portfolio or to select individual properties.

It contains the following sections:
Portfolio Value – Options to see Market or Purchase Value.
Asset Return – Either Appreciation or Levered returns.
Occupancy – Detailed in percent.
Income
Cash Flow
Unit Count
Property Count
Debt – Total
Net Cash Flow – A chart detailed by month & Category
Location – Google map showing all properties in Portfolio View or a single property in Property View
Compare Properties – Rental Income, Market Value, and Square Feet. Available in Portfolio View only
Property Highlights – Property picture from Google Street View, Income, Expenses, LTV, and Occupancy. Available in Property View Only
Summary
I think that Stessa is a great automation tool for rental property accounting. It’s free, cuts down on time spent doing bookkeeping, and makes tax time easier. On top of that, their user support is outstanding! Early on, I identified a couple of bugs and they were fixed within a couple of days. Amazing!
If you are interested in trying out Stessa for your rental properties, please click on the link below:
Stessa Rental Property Accounting
And, as always, let me know what you think in the comments. Ask questions, tell your story.
If you like my posts, please share them with others and subscribe to this blog.
